You've brushed the visible teeth of your fixed All-on-4 bridge, but you're still wondering whether food and plaque are collecting underneath it. That concern is common. A full-arch restoration can look clean and feel secure while the tissue-facing surface, the space beneath the bridge, and the areas around the implant abutments remain difficult to reach.
Learning how to clean All-on-4 dental implants means using more than a regular toothbrush. With the right sequence, gentle technique, and professional maintenance, patients in Katy, TX, including Sunterra, Cane Island, Katy Manor, Kingscrossing, Lakehouse, Marisol, The Grange, Anniston, Katy Lakes, Elyson, and Ventanna Lakes, can care for their fixed smile with confidence.
Why Your All-on-4 Needs a Specialized Routine
You finish brushing and the bridge looks clean, yet food may still sit against the gum tissue underneath. That hidden area is one reason a fixed All-on-4 restoration needs a different home-care routine from natural teeth. The underside, or tissue-facing or intaglio surface, lies close to the mucosa and may be unreachable with a standard toothbrush.
A regular toothbrush remains part of care, but it cannot clean every prosthetic surface. Plaque also collects beneath the bridge and around the abutments that connect the restoration to the implants.
The two levels of daily care
The first level covers the visible restoration and accessible gum surfaces. Use a soft manual brush or a powered brush with a gentle setting on the facial surfaces, palate or tongue side, gumline, and prosthetic teeth.
The second level addresses the tissue-facing surface. A floss threader, super floss, or correctly sized interdental brush can pass beneath the bridge and around the abutments. An oral irrigator may loosen and flush debris from difficult areas, but it does not replace mechanical plaque removal.
A global expert consensus on implant hygiene found that super floss and interdental or proxy brushes were each recommended by 72.7% of respondents. Electric toothbrushes were recommended by 61.2%, and water flossers by 58.7%. The findings support using several tools for different surfaces rather than depending on one device.
Practical rule: If you can see only the front of the bridge while cleaning, you have not reached every surface that needs attention.
The prosthesis design affects access. A convex, polished, self-cleansable contour is easier to maintain than an over-contoured or ridge-lap design. If the bridge consistently blocks cleaning, the problem may be its shape or fit, not your effort. A clinician may need to assess it, adjust access, or remove the prosthesis professionally.
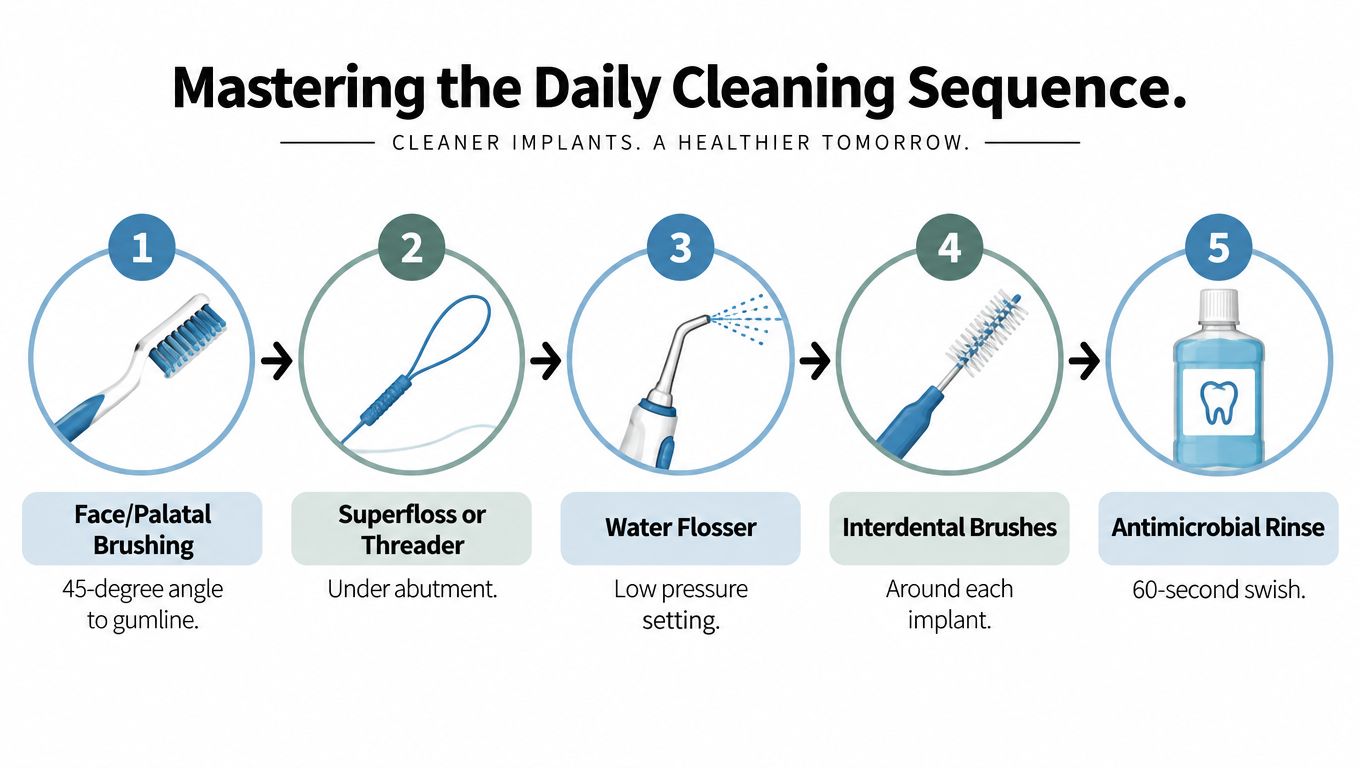
Mastering the Daily Cleaning Sequence
The most reliable routine follows a consistent order. Start with the surfaces you can see, then move underneath the bridge, around each abutment, and into the spaces where plaque tends to remain.
Begin with the external surfaces
Brush at least twice daily. Use a soft manual toothbrush or a powered brush with a gentle setting. Clean the facial surfaces, the palatal or lingual surfaces, the prosthetic teeth, and the gumline. Hold the bristles at approximately a 45-degree angle toward the gumline without scrubbing aggressively.
Slow down around the implant areas. Make small, controlled movements along the edge of the bridge. The goal is to disturb plaque, not to force bristles into the tissue.
Clean beneath the bridge from both sides. Approach the space from the cheek side and the tongue or palate side. A mirror can help you identify where the brush, floss, or interdental cleaner is passing.
Reach the hidden contact areas
An interdental brush should fit the space without force. Angle it along the underside of the bridge and gently pass it against the mucosa-prosthesis contact area. If the brush bends sharply, catches, or causes repeated soreness, stop and ask your dental team to reassess the size and angle.
For floss, use a super floss or floss threader to pass beneath the restoration. Once the floss is around an abutment, cross it in front of the implant-supported bridge and use a gentle back-and-forth “shoeshine” motion. Avoid snapping the floss into the tissue.
A water flosser can follow mechanical cleaning. Use a low-pressure setting and guide the stream beneath the bridge, rather than directing force directly into tender tissue.
Pay particular attention to the lower arch. Research found that hygiene was poor overall and worse for mandibular than maxillary full-arch prostheses, especially in the front region (prosthesis design and full-arch hygiene findings).
Finish with an alcohol-free, pH-neutral antimicrobial rinse only if your clinician recommends it. Rinsing can support the routine, but it can't remove established biofilm by itself.
Here is a visual demonstration of the sequence and tool positioning:
Choosing the Right Tools for Implant Care
A bridge may feel smooth from the cheek side while plaque collects beneath its tissue-facing surface. Choose tools that reach those contours without forcing against the gums. Your bridge design, tissue anatomy, and hand control determine the right combination.
| Tool | Primary Purpose | Frequency |
|---|---|---|
| Soft manual or powered toothbrush | Cleans visible prosthetic and gum surfaces | At least twice daily |
| Super floss or floss threader | Reaches beneath the bridge and around abutments | Daily |
| Interdental or proxy brush | Cleans implant spaces and the tissue-facing surface | Daily |
| Water flosser | Flushes loose debris from difficult areas | As an adjunct to mechanical cleaning |
| pH-neutral, alcohol-free rinse | Supports plaque and odor control when appropriate | As directed by your clinician |
As covered above, super floss and interdental brushes top the expert consensus list. The table shows how each tool fits a daily routine. A brush should pass through the space with light resistance. For tight abutment areas, an ISO size 0 to 2 brush may be a useful starting range, but the correct size depends on the opening. A brush that bends, catches, or causes recurring soreness is too large, poorly angled, or contacting an irregular surface.
An electric toothbrush can help if hand control or endurance is limited. A manual brush works well when you can maintain light pressure and reach the gumline and prosthesis contours. The practical choice is the device that lets you clean every area consistently without scrubbing.
Water flossers can flush food from beneath a fixed restoration, particularly after meals. They do not reliably scrape plaque from each surface, so pair them with a brush or threader. Use an implant-compatible product and pH-neutral dentifrice. Your clinician should confirm the brush size, pressure, and angle, especially if the tissue beneath the bridge is tender or difficult to access.
Patients at The Dental Retreat can receive site-specific instruction for cleaning along the gumline, beneath the restoration, and around each implant-supported area. Review these interdental cleaning tools for implant care before your appointment, then bring any tool that feels difficult to use so the team can adjust your technique.
The Truth About Professional Maintenance
A bridge that feels stable can still hide plaque, calculus, or irritated tissue along its underside. Routine professional care does not automatically mean unscrewing the restoration. Prosthodontic guidance indicates that screw-retained full-arch restorations generally can remain in place when the dental team can clean and examine the supporting areas effectively (prosthodontic guidance on full-arch implant maintenance).
Removal becomes reasonable when the tissue-facing surfaces cannot be reached, home care and professional cleaning are no longer adequate, peri-implantitis is suspected, or a mechanical problem requires direct access. The decision should follow the clinical findings, not a routine calendar rule.
What maintenance should include
An implant maintenance visit examines the hidden contours beneath the prosthesis as well as the visible acrylic. The team may:
- Record bleeding and probing: Measure peri-implant probing depths and compare them with baseline findings when available.
- Remove biofilm and calculus: Use instruments suited to the implant surfaces and prosthetic materials.
- Inspect the soft tissue: Check for swelling, recession, tissue overgrowth, suppuration, and irritation beneath the bridge.
- Evaluate the prosthesis: Assess contours, access for cleaning, fit, abutments, screws, bite, mobility, odor, and fracture risk.
- Take radiographs when indicated: Use imaging when examination findings require assessment below the visible tissue.
The cleaning method should match the restoration and the condition of the tissues. Evidence reviews report that glycine powder air-polishing and implant-compatible ultrasonic instrumentation generally improved inflammatory measures more effectively than curette-only debridement, while sustained home plaque control remained important (evidence review of professional implant maintenance).
Recall timing depends on risk. In consensus data, 44.9% of experts recommended professional hygiene twice yearly, 32.2% once yearly, and 11.9% four times yearly for full-arch implant patients. 58.5% favored follow-up more frequently than annually (consensus data on implant maintenance intervals).
A six-month interval may suit many patients. Visits may need to occur approximately every three or four months when plaque control is poor, diabetes or other risks are uncontrolled, smoking is present, or previous peri-implant inflammation has occurred. Your dentist should set the interval after examining your mouth.
Review these periodontal maintenance procedures before scheduling care.
Red Flags That Require Immediate Attention
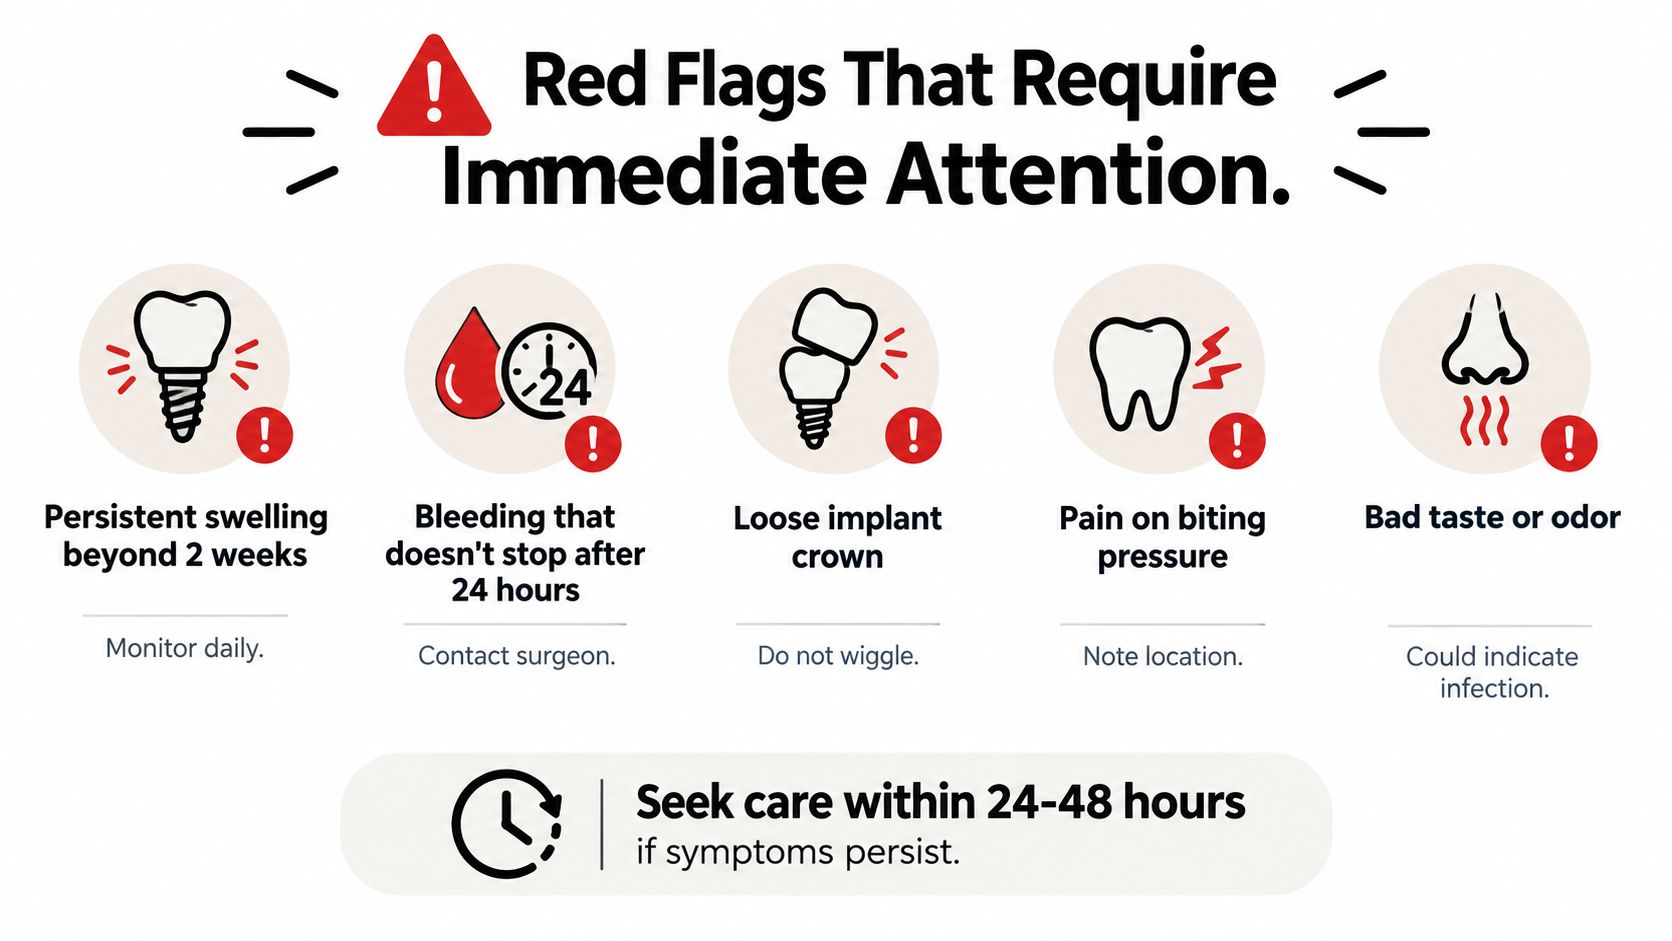
A fixed bridge may look clean while tissue beneath it becomes inflamed. If your usual symptoms change, contact your implant provider rather than waiting for the next hygiene visit. A combination of bleeding, swelling, odor, or tenderness deserves particular attention.
The tissue-facing surfaces under the bridge can trap plaque and food beyond the reach of a toothbrush. Persistent bleeding, swelling, pus, pain, a bad taste, or an unpleasant odor may signal inflammation around an implant. Odor can also result from trapped debris, but the source needs to be identified. A loose bridge or component, a click, a fracture, or a sudden bite change may indicate a mechanical problem. Do not wiggle the part or attempt to tighten it yourself.
Call rather than waiting
Contact an implant provider promptly if you notice:
- Persistent bleeding: Bleeding that continues after gentle cleaning should be assessed.
- Swelling or pus: These findings can indicate active inflammation or infection.
- Bad taste or odor: The cause may be trapped debris, an inaccessible tissue-facing surface, or inflammation beneath the bridge.
- Pain or tenderness: Pain during chewing or around one implant site should not be ignored.
- Looseness or bite change: Movement, clicking, a fracture, or an altered bite requires professional evaluation.
Early assessment matters after implant treatment. In a larger All-on-4 analysis, failures were recorded most often during the first year. That pattern does not mean every symptom represents implant failure, but it supports calling your care team before discomfort becomes severe.
Professional care may include technique coaching, cleaning around the restoration, risk-factor management, or temporary removal and modification of the prosthesis when its contours block access. A dentist must first ensure that you can maintain adequate home cleaning before proceeding with surgical treatment.
Partnering with The Dental Retreat in Katy
All-on-4 maintenance works best as a partnership. Your daily routine controls plaque between visits, while your dental team checks the tissue, bone support, bite, prosthesis, and areas you can't inspect fully at home.
At The Dental Retreat in Katy, patients can receive complete implant care in a calm, spa-inspired setting. Aromatherapy, massage or heated chairs, noise-cancelling headphones, and TVs in every room are available to help make dental visits more comfortable. The practice also provides implant, periodontic, oral surgery, sedation, emergency, restorative, cosmetic, and general dental services.
Care designed around your situation
A maintenance visit may be appropriate if you need dental implants near me, have difficulty cleaning beneath a fixed bridge, or want a professional opinion about bleeding or odor. The team can also help with cleaning and exams, dental X-rays when needed, new patient exams, tooth extraction, cosmetic dentistry, teeth whitening, restorative dentistry, and emergency dental services.
New patients without insurance can choose a $99 exam with cleaning and X-rays, a $49 problem-focused visit, or $350 in-office Zoom whitening, according to the practice's current offers. Membership plans start at $299 per year, with savings for periodontal maintenance. Confirm current eligibility and pricing when you contact the office.
Whether you live in Sunterra, Cane Island, Katy Manor, Kingscrossing, Lakehouse, Marisol, The Grange, Anniston, Katy Lakes, Elyson, or Ventanna Lakes, a local maintenance plan can make it easier to address small concerns before they interfere with your comfort or confidence. The Dental Retreat is located on Stockdick School Rd. in Katy and welcomes patients seeking a dentist near me, a dentist in Katy, TX, a cosmetic dentist near me, or an emergency dentist.
The Dental Retreat provides personalized All-on-4 cleaning guidance, professional implant maintenance, and complete dental care in a calm Katy setting. Schedule an implant consultation or maintenance visit at The Dental Retreat to review your technique, examine the hidden surfaces beneath your bridge, and protect your long-term smile.